Taking and making a video has always been a great method to capture precious moments in daily life. A proper background soundtrack in videos would be the icing on the cake. With the development and popularity of streaming music, people can find more and more amazing music resources on different platforms. Featuring the largest music library, Spotify is the obvious choice.
Premiere Pro is one of the most professional and popular video editing software for many video makers. So how to add Spotify music to Premiere Pro for use as video background music? If you are eager to solve the puzzle effectively, congratulations, you are in the right place. Let’s take a look at how to put Spotify music into Premiere Pro by doing a few clicks with the help of a third-party tool.
- Part 1. Add Spotify Music to Premiere Pro – What You’ll Need
- Part 2. How to Import Music from Spotify to Premiere Pro
- Part 3. In Conclusion
Part 1. How to Add Spotify Music to Premiere Pro – What You’ll Need
The obvious downside of streaming music services, as they are known, is that all tracks are under protection. It limits you from listening to streaming music on the provider’s own app or website only. So does Spotify. And the downloaded Spotify music is cache files that you even can’t locate locally.
This is a huge challenge for those video producers. Because most video editors, including Premiere Pro, only support importing music from local folders. In this case, to use Spotify music in Premiere Pro, it’s necessary to download Spotify music to Premiere Pro-supported local audio files.
When it comes to downloading Spotify playlists and songs, AudFun Spotify Music Converter is your best option. It’s also good at unlocking the protection in Spotify files. Every type of Spotify audio file, such as tracks, podcasts, audiobooks, playlists, radios, etc., can be downloaded to local computers well.
It also has the ability to convert Spotify music to Premiere Pro-supported MP3, WAV, and AAC files without compromising the original quality. The original metadata and ID3 tags, such as artist, album, genre, year, and so on, can be kept entirely in the converted music file. The smart tool uses state-of-the-art technology and is able to work at 5X faster conversion speed.
Key Features of AudFun Spotify Music Converter
- Download Spotify songs, playlists, audiobooks, albums for free
- Convert Spotify to Premiere-supported files, FLAC, WAV, M4B
- Import music from Spotify to Premiere Pro, iMovie, etc.
- Edit output music settings and parameters of Spotify files
Part 2. How to Import Music from Spotify to Premiere Pro
Before you get started to download music for Adobe Premiere Pro from Spotify, please note the below three points.
1. Make sure that your computer has connected audio output devices, such as speakers and headphones, and they are connected properly.
2. Make sure the tracks are available on Spotify and you can play them well before conversion.
3. This tool doesn’t require a Spotify Premium account. No need to upgrade your account. You can directly log into your free account to add Spotify playlists that you’d like to use in Premiere Pro.
2.1 Download Music onto Premiere from Spotify
Step 1 Add Spotify music to use in Adobe Premiere Pro
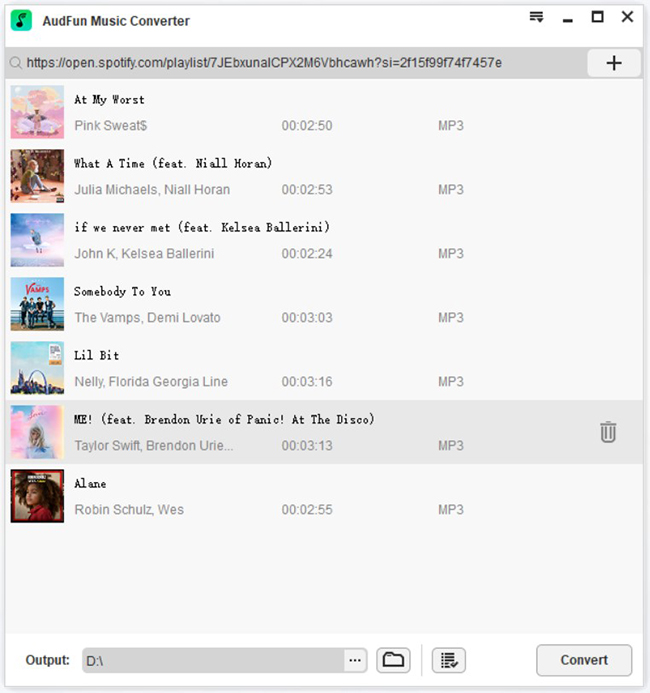
Download, install and open AudFun Spotify Music Converter on your Mac or Windows computer. At the same time, the Spotify app will launch automatically. Copy the URL of the Spotify song, playlist, or album and paste it into the blank search bar in AudFun Software. Now click the + button next to the bar to load Spotify songs to the main interface. Or you can choose to drag and drop Spotify music into the blank field on the AudFun home page. After a few seconds, the song you selected will be successfully added.
Step 2 Reset output settings of Spotify music for Premiere Pro
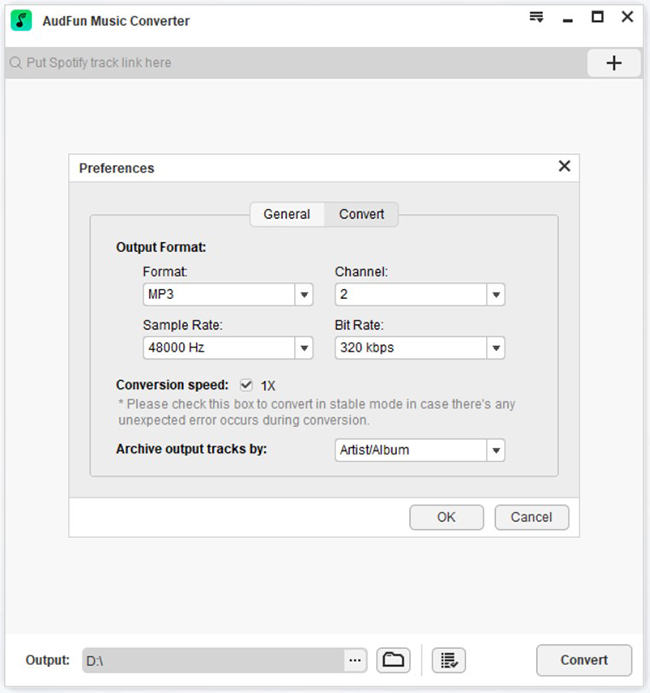
This tool allows you to personalize the output parameters of Spotify tracks as required. It is recommended that you click on the hamburger icon in the menu bar. Then go to the Preferences > Convert section to click the drop-down icon to see details of the output parameters for each option, such as format, bit rate, sample rate, channel, and so on. Please choose MP3, WAV, or M4A as the output format for Premiere Pro. To maintain the same quality as the original, you can set the bit rate to 320kbps and the sample rate to 48000 Hz.
Step 3 Download music onto Premiere from Spotify
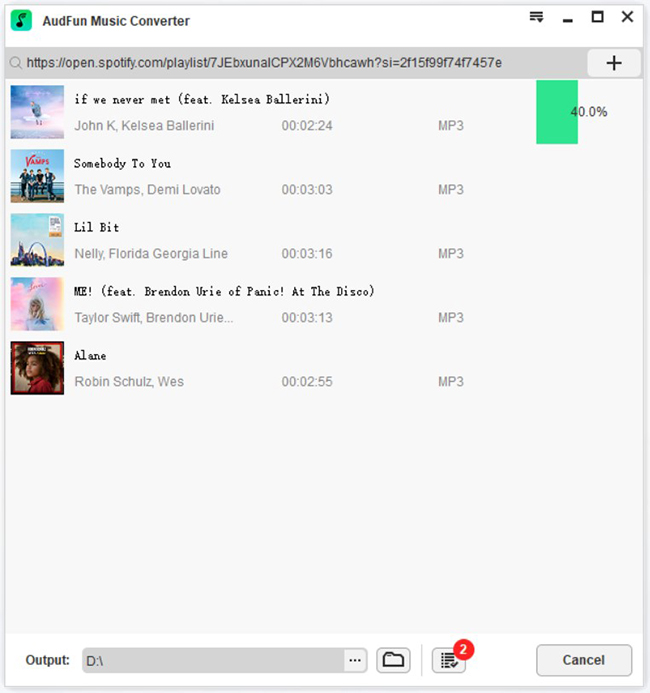
Please press the big Convert button in the lower right corner of AudFun Spotify Music Converter. The software will start converting Spotify songs to the settings you choose based on Premiere Pro requirements. The conversion process will take some time, depending on the number of Spotify music in the queue and the Internet connection. After completion, please follow the screen prompts to find the local Spotify music folder. You can get music into Adobe Premium Pro without a problem.
2.2 Add Music to Premiere Pro from Spotify
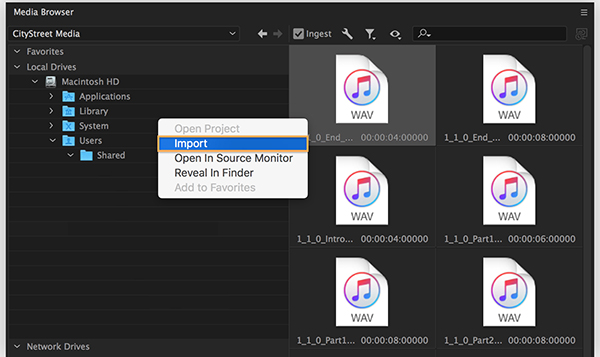
Now, you can use Spotify for Premiere Pro as background music.
Click the Audio at the top of the Premiere Pro main interface to open the Audio workspace. And then choose the Windows > Media Browser to navigate to your local Spotify music folder and choose them. Now, please click the Import button to add songs to Premiere from Spotify.
Make sure you have opened the video project in Adobe Premiere Pro ahead of time. Now, Spotify songs are in the Project panel. You can start to adjust the Spotify audio track volume, fades, and other audio effects and set them as the background music in Premiere Pro videos.
Part 3. In Conclusion
That’s all to add Spotify music Premiere Pro. As a matter of fact, with the assistance of the AudFun Spotify Music Converter, you can also add Spotify Music to Adobe Premiere Rush, and other popular editing software, like iMovie, Final Cut Pro, and so forth. Don’t miss any suitable and pleasant music on Spotify to make your videos more attractive.