Audiomack is a popular music streaming platform where you will find music of every genre. The best part about Audiomack is that this platform is both for music lovers and creators. Audiomack allows music creators to create as well as upload their music so that music lovers can enjoy them. Moreover, there is no storage limitation. Audiomack has segregated its library for users to quickly find the music they want to listen to.
Since Audiomack is such a popular music streaming platform, many users question whether they can import music from Spotify to Audiomack or not. If you also want to know how to transfer your Spotify playlist to Audiomack, you have come to the right place. This guide will help you understand how to download and add Spotify songs to Audiomack without any hassle. So, let’s begin.
- Part 1. Import Music from Spotify to Audiomack – Tool You Need
- Part 2. Convert Spotify Playlists for Adding to Audiomack
- Part 3. Transfer Playlists from Spotify to Audiomack
- Extra Tips: Transfer an Audiomack Playlist to Spotify
- Conclusion
Part 1. Import Music from Spotify to Audiomack – Tool You Need
Can You Add Spotify Playlist to Audiomack?
Before we explain how you can move Spotify music to Audiomack, here’s something important that everyone should know. There is no direct way to transfer songs from Spotify to Audiomack, and that’s because all the songs on Spotify are protected. This means that you cannot add the downloaded Spotify songs to Audiomack and can only play them on the Spotify app. So if you are asking can I transfer songs from Spotify to Audiomack, the answer is NO. Whether you’re a Spotify Free or Premium user, the rule is the same for everyone.
Best Tool to Get Spotify Music on Audiomack
So, how to make Audiomack Spotify songs transferable? To be able to do that, you will first need a Spotify song converter and downloader that will let you save Spotify music as the audio formats supported by Audiomack. The recommended tool to use is AudFun Spotify Music Converter.
AudFun Spotify Music Converter is a professional Spotify converter to download Spotify songs offline super fast. It converts music from Spotify at 5X speed. Not just this, you can convert Spotify songs into multiple audio formats, such as MP3, WAV, AAC, etc. which enables you to play Spotify playlists on Audiomack and other music streaming platforms easily.
AudFun Spotify Music Converter is seamless to use, and you don’t need any technical knowledge to start using it. It won’t need a Spotify Premium to download Spotify tracks and the sound quality downloaded by the converter is the same as the original one. The most outstanding point is that it removes all kinds of restrictions so that you can listen to your favorite Spotify songs offline whenever and wherever you want to!

Key Features of AudFun Spotify Music Converter
- Download unlimited Spotify songs for offline listening on Audiomack
- Convert Spotify songs to audio formats compatible with Audiomack
- Preserve the original audio quality and ID3 tags of Spotify
- Convert Spotify songs at 5X speed in batch
Part 2. How to Convert Spotify Playlists for Adding to Audiomack
In order to add Spotify music to Audiomack, you will first need to download AudFun Spotify Music Converter. The AudFun app is available for Mac and Windows users. After downloading and installing AudFun Spotify Music Converter, follow the guide below step by step.
Step 1 Add Spotify to AudFun Spotify Music Converter
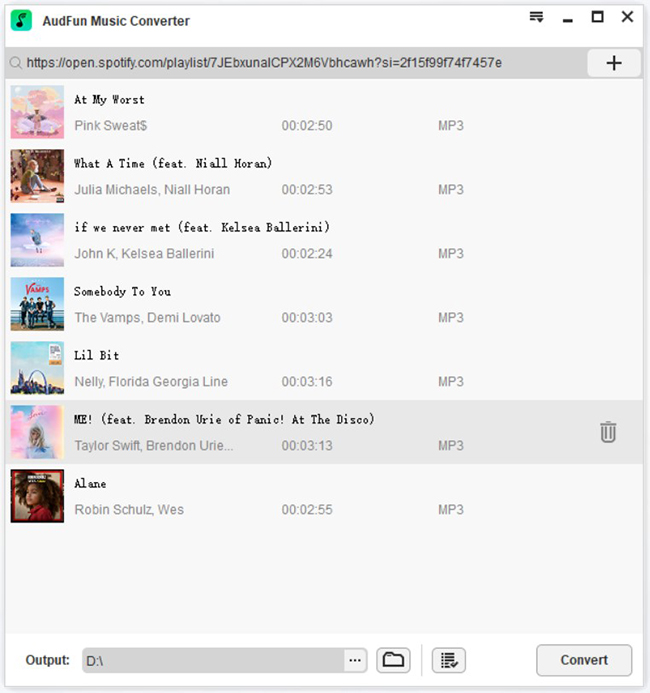
Once you launch the AudFun program, please find the Spotify songs that you prefer on the Spotify desktop app. Do note that you can download any song from Spotify you want. Once you decide which Spotify track to download, you need to click on the “Share” option under More and then click on the “Copy Song Link” option. After that, paste the Spotify link to the search bar of AudFun software. Click on the + icon to start adding the song.
Step 2 Customize Spotify audio settings for Audiomack
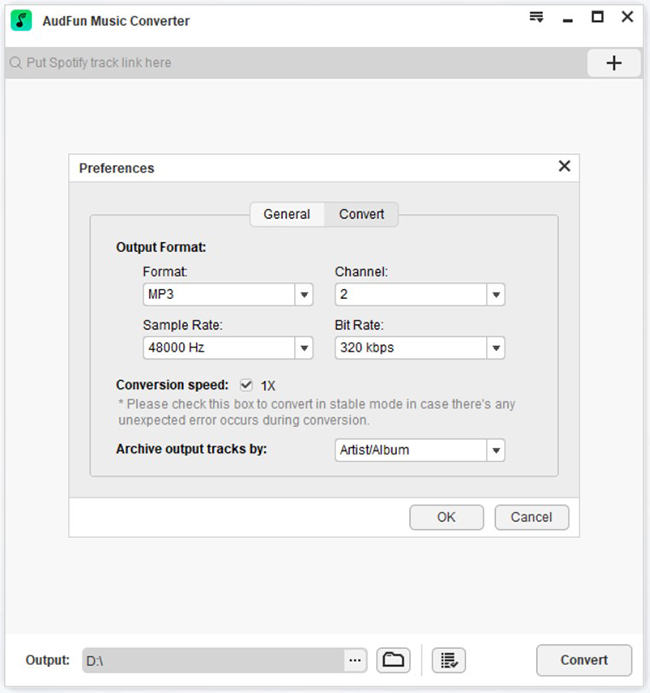
Now, click on the “Preferences” tab and then select the “Convert” tab. This will open the settings window where you can customize the audio parameters for Spotify tracks. For example, you can choose to convert Spotify to MP3, AAC, WAV, and other formats that can be added to Audiomack under Format. Meanwhile, you’re entitled to adjust the channel, sample rate, bit rate, and more for Spotify music. Tap the OK button after all modifications are made.
Step 3 Start converting songs from Spotify for Audiomack
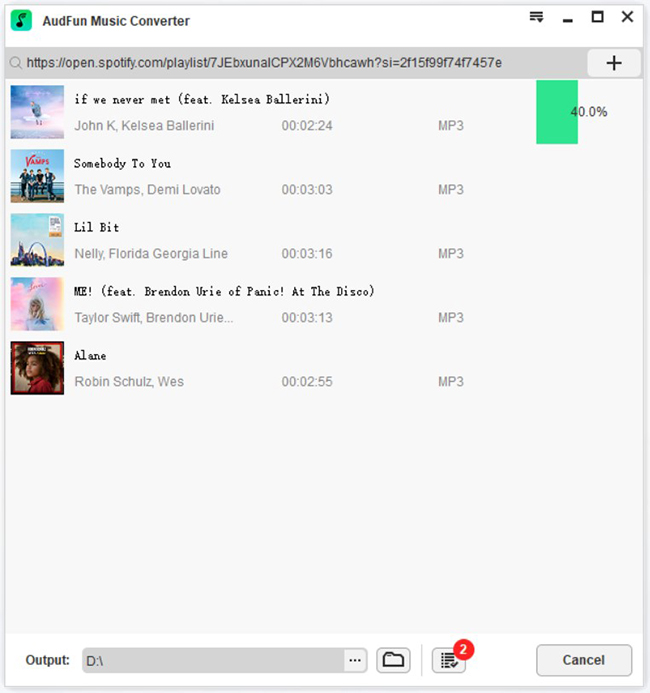
After everything is done, move your cursor to the bottom right, and you will see the “Convert” tab. Hit on it and launch the Spotify conversion process. All the Spotify music files will be downloaded at 5X speed if you didn’t set 1X conversion speed at the previous step. You won’t have to wait too long. Once all Spotify tracks you selected are converted, they will be saved in the local folder that you choose from the bottom display icon “…”.
By following these three steps, you’ve learnt the ways to download Spotify songs without premium as local files. After that, you can add Spotify music to Audiomack seamlessly.
Part 3. How to Transfer Playlists from Spotify to Audiomack
You are almost there to start playing Spotify playlists on Audiomack. Below you will find the detailed steps to transfer the Spotify playlist to Audiomack.
Step 1: Launch Audiomack and log in using your credentials. You will see the “Upload” tab, and click on that. Then, click on the option that says “Upload a Song” and then click on the “Open” option. Please note that the songs you will add can’t exceed 250 MBs.
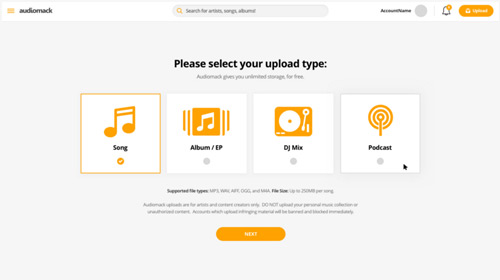
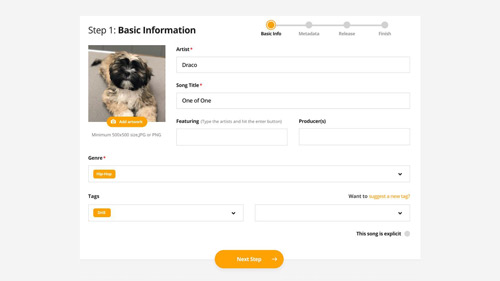
Step 2: Select the folder with downloaded Spotify music files. Start adding Spotify songs and ensure to add relevant information, such as file name, artist name, cover photo, etc. Click on the “Next” option to save the song’s description, URL for the same, if any, YouTube link, etc.
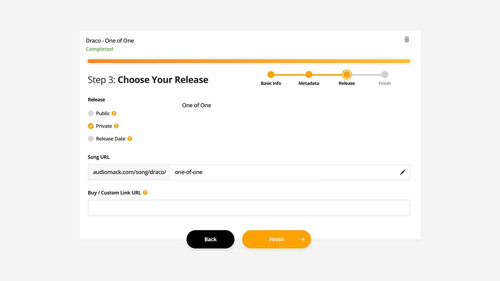
Step 3: The last step will ask you to add “Release Type“. You can keep the songs private so that only you listen to them or make them public so that everyone can listen to them. That’s up to you. If you are an artist and want to let more people know about your creativity, keeping the song public will make more sense. Then, click on the “Finish” tab to complete the transfer process.
Extra Tips: How to Transfer an Audiomack Playlist to Spotify
Now that you’ve known how to transfer Spotify playlist to Audiomack.But what if you want to move Audiomack to Spotify? Here is the tips for you.
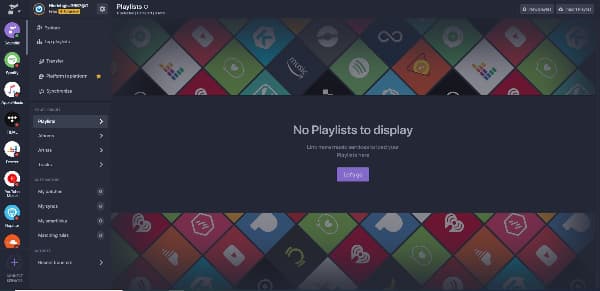
Step 1: Visit soundiiz.com and open the web app.
Step 2: Then you need to visit your library. Click on the Playlists category.
Step 3: Now you need to connect Audiomack and Spotify to Soundiiz. To do this you need to click on the left panel.
Step 4: Once done you need to choose the Audiomack playlists that you wish to transfer to Spotify.
Step 5: After this, you need to select the Convert tools, which you will see in the top tool toolbar.
Step 6: You will have to select Spotify as the destination.
Step 7: The transfer process will start and when completed, you will be able to see the Audiomack playlist on Spotify.
In Conclusion
So, now you know how to import music from Spotify to Audiomack conveniently. The AudFun Spotify Music Converter can help you easily get Spotify music downloaded to the format supported by Audiomack and play on it without any loss. As you can see, there are a few steps in this article that you need to take care of, but if you follow the steps carefully, you will be able to transfer as many Spotify songs to Audiomack as you want. We hope this guide will be helpful, and to start adding Spotify songs to Audiomack, go and download AudFun Spotify Music Converter.
